Usage#
Here we walk through a typical user workflow. This assumes you’ve already
installed the dask-gateway client library (see Installation) and
have a dask-gateway-server running somewhere. For a completely local setup
of both client and server (for demos, testing, etc…) see Install Locally (Quickstart)
instead.
Connect to a dask-gateway server#
Users interact with a dask-gateway-server via the dask-gateway client
library. Typically a session starts by creating a Gateway client. This
takes a few parameters:
address: The full address of the dask-gateway server.proxy_address: The full address of the dask-gateway scheduler proxy. If not provided, this defaults toaddress.auth: The authentication method to use
The values for each of these are specific to your deployment - consult your administrator for more information about your specific deployment.
from dask_gateway import Gateway

# -- Here we provide a few examples of creating a `Gateway` object --

# Gateway server running at http://mygateway.com with kerberos authentication
gateway = Gateway(
    address="http://mygateway.com",
    auth="kerberos"
)

# Gateway server at http://146.148.58.187, proxy at
# tls://35.202.68.87:8786, with JupyterHub authentication
gateway = Gateway(
     "http://146.148.58.187",
     proxy_address="tls://35.202.68.87:8786",
     auth="jupyterhub",
)
Typically these parameters are configured once in Configuration, at
which point a Gateway object can be created with no parameters.
from dask_gateway import Gateway

# Use values stored in your local configuration (recommended)
gateway = Gateway()
To check that everything is setup properly, query the gateway to see any existing clusters. If this call completes, you should have a properly configured gateway client.
>>> gateway.list_clusters()
[]
Create a new cluster#
To create a new cluster, you can use the Gateway.new_cluster() method.
This will create a new cluster with no workers.
>>> cluster = gateway.new_cluster()
>>> cluster
GatewayCluster<6c14f41343ea462599f126818a14ebd2>
Alternatively, you can skip creating a Gateway object, and use the
GatewayCluster constructor directly.
>>> from dask_gateway import GatewayCluster
# Create a new cluster using the GatewayCluster constructor directly
>>> cluster = GatewayCluster()
The choice between methods is largely preferential. If you need to interact
with the gateway server only to create a new cluster then using
GatewayCluster may be simpler. If you need to perform other operations
(e.g. querying running clusters) then you may wish to use a Gateway
instead.
Configure a cluster#
Some dask-gateway-server deployments allow users to configure their
clusters upon launching. Typical options may include specifying worker
memory/cores or which docker image to use. To see which options (if any) your
server supports you can use the Gateway.cluster_options() method.
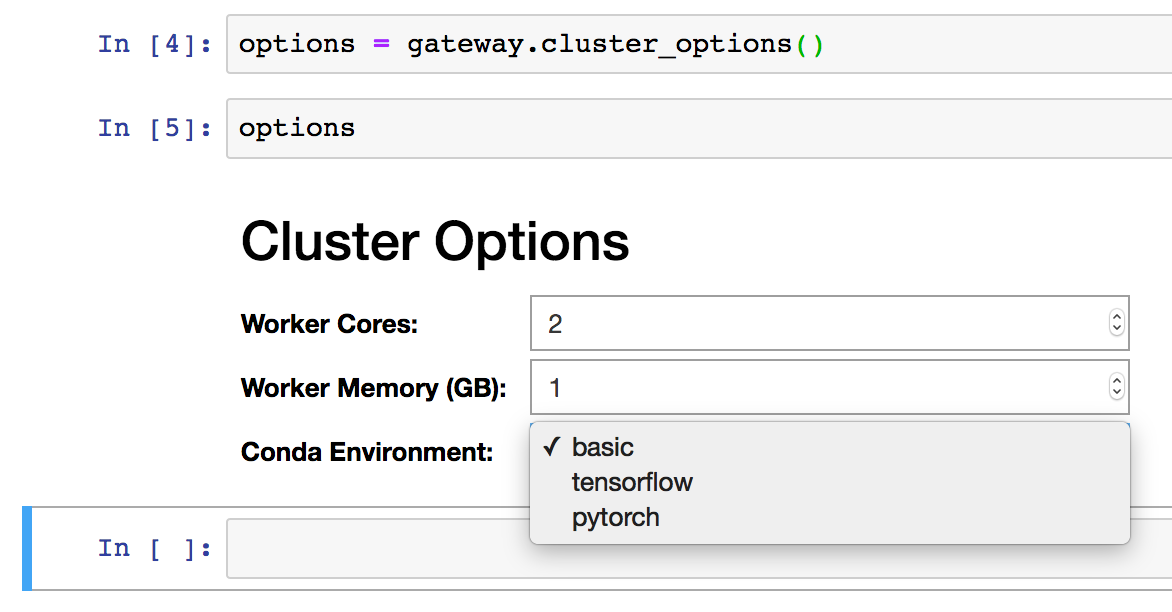
>>> options = gateway.cluster_options()
>>> options
Options<worker_cores=1, worker_memory=1.0, environment='basic'>
This returns a Options object, which describes the options available.
The options object is a MutableMapping, that also supports attribute access of
fields.
# Both attribute and key access works
>>> options.worker_cores
1
>>> options["worker_cores"]
1

# Can change values using attribute or key access
>>> options.worker_cores = 2
>>> options.worker_cores
2
Note that validation of the fields is done both client and server-side. For
example, if a limit has been set on a numeric field (e.g. max
worker_cores), then a nice error will be raised if that limit is exceeded.
>>> options.worker_cores = 10
    Traceback (most recent call last):
            ...
    ValueError: worker_cores must be <= 4, got 10
If you’re working interactively in a Jupyter Notebook or JupyterLab and have ipywidgets installed, you can also use the provided widget for configuring your cluster.
Once Options object has the desired values set, you can pass this to
Gateway.new_cluster() or GatewayCluster to use these values when
creating a new cluster.
# Using Gateway.new_cluster
>>> cluster = gateway.new_cluster(options)

# Or using the GatewayCluster constructor
>>> cluster = GatewayCluster(cluster_options=options)
Alternatively, if you know the configurable options available on your
dask-gateway-server deployment, you can pass in your values directly as
keyword arguments to either method:
# Using Gateway.new_cluster
>>> cluster = gateway.new_cluster(worker_cores=2, environment="tensorflow")

# Or using the GatewayCluster constructor
>>> cluster = GatewayCluster(worker_cores=2, environment="tensorflow")
Scale up a cluster#
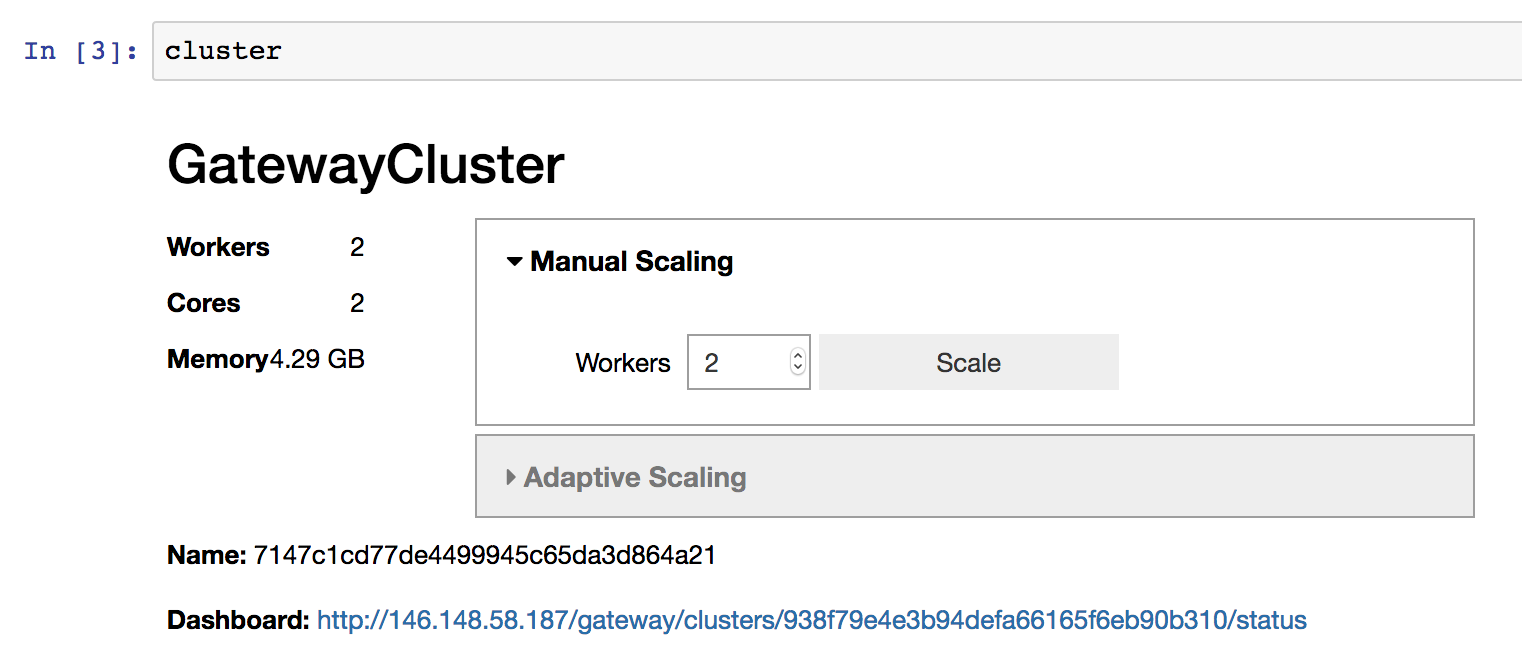
To scale a cluster to one or more workers, you can use the
GatewayCluster.scale() method. Here we scale our cluster up to two
workers.
>>> cluster.scale(2)
If you’re working interactively in a Jupyter Notebook or JupyterLab and
have ipywidgets installed, you can also use the provided widget to change the
cluster size, instead of calling GatewayCluster.scale() programmatically.
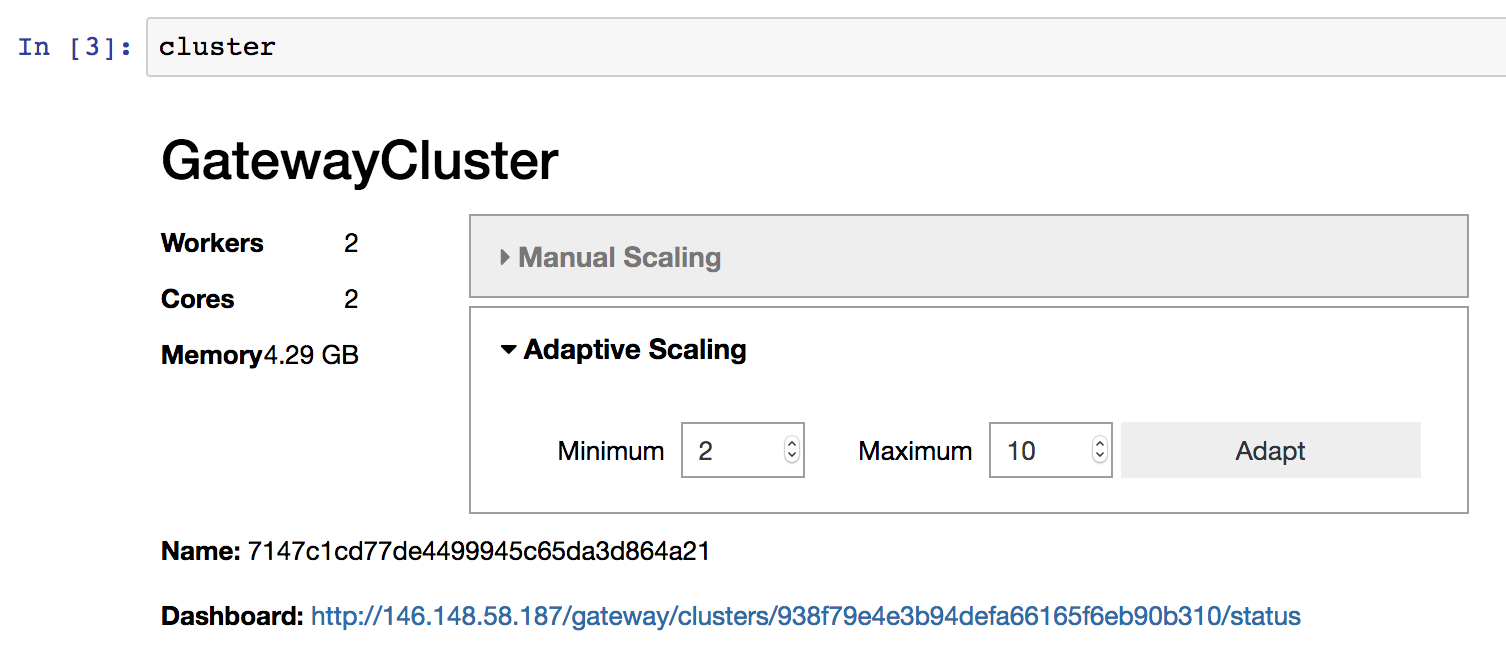
Enable adaptive scaling#
Alternatively, you can use adaptive scaling to allow your cluster to scale
up/down based on load. This can be useful in reducing resource usage only to
what’s currently required for your workload. To enable adaptive scaling you can
use the GatewayCluster.adapt() method.
# Adaptively scale between 2 and 10 workers
>>> cluster.adapt(minimum=2, maximum=10)
As with manual scaling above, if you’re working in a notebook environment you
can also use the provided widget to enable adaptive scaling , instead of
calling GatewayCluster.adapt() programmatically.
If you wish to disable adaptive scaling later you can pass in active=False:
# Disable adaptive scaling
>>> cluster.adapt(active=False)
Connect to the cluster#
To connect to the cluster so you can start doing work, you can use the
GatewayCluster.get_client() method. This returns a
dask.distributed.Client object.
>>> client = cluster.get_client()
>>> client
<Client: scheduler='tls://198.51.100.1:65252' processes=2 cores=2>
Run computations on the cluster#
At this point you should be able to use normal dask methods to do work. For
example, here we take the mean of a random array.
>>> import dask.array as da
>>> a = da.random.normal(size=(1000, 1000), chunks=(500, 500))
>>> a.mean().compute()
0.0022336223893512945
Shutdown the cluster#
When you’re done using it, you can shutdown the cluster using the
Cluster.shutdown() method. This will cleanly close all dask workers, as
well as the scheduler.
>>> cluster.shutdown()
Note that when a GatewayCluster object is used as a context manager,
shutdown will be called automatically on context exit:
with gateway.new_cluster() as cluster:
    client = cluster.get_client()
    # ...
Alternatively, lingering cluster objects will be automatically shutdown when
your client process closes. It’s good practice to explicitly clean things up,
but it’s not strictly necessary. If you want clusters to persist longer than
the lifetime of your client process, set shutdown_on_close=False when
calling Gateway.new_cluster().
Connect to an existing cluster#
Alternatively, you can leave a cluster running and reconnect to it later. To
do this, set shutdown_on_close=False when calling
Gateway.new_cluster() - this allows Dask clusters to persist longer than
the lifetime of your client process.
# Create a new cluster which will persist longer than the lifetime of the
# client process
cluster = gateway.new_cluster(shutdown_on_close=False)
To connect to a running cluster, you need the cluster’s name (a unique
identifier). If you don’t already know it, you can see all running clusters
using the Gateway.list_clusters() method.
>>> clusters = gateway.list_clusters()
>>> clusters
[ClusterReport<name=ce498e95403741118a8f418ee242e646, status=RUNNING>]
You can then connect to an existing cluster using the Gateway.connect()
method.
>>> cluster = gateway.connect(clusters[0].name)
>>> cluster
GatewayCluster<ce498e95403741118a8f418ee242e646>